This manual describes how to setup, onboard and manage the duplex data exchange between Arduino ESP8266 board and Amazon IoT services. Similar steps should be applicable to ESP32 board.
Use case:
Make the temperature and humidity sensor (e.g. DHT11), powered by NodeMCU ESP8266 board send temperature and humidity data to the Amazon cloud and occasionally get back some configuration data. That's what means by "duplex communication".
Step 1.
Get a NodeMCU ESP8266 board and appropriate driver for your system. E.g. for NodeMCU ESP8266 on Windows we use CH340 drivers. Refer to your board manufacturer page (or, simply, Google) for suitable drivers.
Step 2.
Power up ESP8266 board by connecting to the computer via Micro USB cable. IMPORTANT! Do not connect any of sensors or other stuff to the board yet! Just have "naked" GPIO pins. Connected sensors may prevent flashing the firmware. We'll connect them later.
Step 3.
Go to Device Manager or similar tool and find your connected device under Ports. Remember the port number, which is used by your ESP8266 board. Let's assume this is COM5.
At this moment, hardware setup is done. Now proceed with software configuration.
Step 4.
Download and install AWS Command Line Interface (CLI). See https://aws.amazon.com/cli/. For this tutorial Windows 64-bit version is used.
Step 5.
Configure access to AWS Cloud via CLI (sample values are used here):
$ aws configure
AWS Access Key ID [None]: AKSAMPLEVALUEQQCVCVO
AWS Secret Access Key [None]: t4saMPLeValueforSecreAccessKey+5WyzZwQWJ
Default region name [None]: us-east-1
Default output format [None]: json
Check configuration is working well:
$ aws iot list-things
{
 "things" : []
}
Getting empty list of "things" without any error message means all necessary configuration applied successfully.
To make ESP device onboarding seamless and IoT development significantly easier, let's use Mongoose OS.
Step 6.
Download and install mos tool from the https://mongoose-os.com/docs/mongoose-os/quickstart/setup.md
Actually, original Mongoose tutorial refers to GUI-enabled option, when using mos tool, but all the functionality available in command line mode as well.
Step 7.
One of the advantages of using Mongoose OS is the Javascript library (mJS) which can be used to simplify the IoT development. Although some functions still need the C-language knowledge, but in this tutorial all the stuff are working with mJS.
So, clone the "startup" repository, e.g. git clone https://github.com/mongoose-os-apps/demo-js app1
This is the JS demo Mongoose OS app. It gets installed by default at Mongoose OS installation step. It has a lot of functionality enabled - cloud integrations, JavaScript engine, etc. Its main purpose is to demonstrate the capabilities of Mongoose OS.
Make the fs\init.js file look like this:
load('api_aws.js');
load('api_config.js');
load('api_events.js');
load('api_gpio.js');
load('api_mqtt.js');
load('api_shadow.js');
load('api_timer.js');
load('api_sys.js');
load('api_file.js');
load('api_net.js');
load('api_http.js');

let btn = Cfg.get('board.btn1.pin'); // Built-in button GPIO
let led = Cfg.get('board.led1.pin'); // Built-in LED GPIO number
let onhi = Cfg.get('board.led1.active_high'); // LED on when high?
let state = {
  on: false,
  btnCount: 0,
  uptime: 0
}; // Device state
let online = false; // Connected to the cloud?

let setLED = function(on) {
  let level = onhi ? on : !on;
  GPIO.write(led, level);
  print('LED on ->', on);
};

GPIO.set_mode(led, GPIO.MODE_OUTPUT);
setLED(state.on);

let reportState = function() {
  Shadow.update(0, state);
};

print('LOADING CONFIG...');

let configContent = File.read('settings.json');
print('CONFIGURATION LOADED ----');
print(configContent);
print('-------------------------');

let conf = {};

if (configContent !== null) {
  conf = JSON.parse(configContent);
} else {
  conf = {
    "refresh": 9000
  };
}

let refreshRate = conf.refresh;
state.refresh = conf.refresh;

let wait_for_job = 0;

// Update state every second, and report to cloud if online
Timer.set(refreshRate, Timer.REPEAT, function() {
  print('CURRENT REFRESH RATE = ', refreshRate);
  state.uptime = Sys.uptime();
  state.ram_free = Sys.free_ram();
  print('ONLINE ***************:', online, JSON.stringify(state));
  if (online) reportState();

  print('AWS.isConnected() = ', AWS.isConnected());
  print('MQTT.isConnected() = ', MQTT.isConnected());


  if (wait_for_job === 0) {


    if (AWS.isConnected() || MQTT.isConnected()) {
      let topic = '$aws/things/' + Cfg.get('device.id') + '/jobs/notify';
      print('==++++ Listening to  ' + topic);

      wait_for_job = 1;


      MQTT.sub(topic, function(conn, topic, payload) {
        print('### JOB RECEIVED!!!: ', payload);
        let jobContent = JSON.parse(payload);
        if (jobContent.jobs.QUEUED) {
          let statusTopic = '$aws/things/' + Cfg.get('device.id') + '/jobs/' + jobContent.jobs.QUEUED[0].jobId + '/update';
          MQTT.pub(statusTopic, '{"status":"SUCCEEDED","expectedVersion":"1","clientToken":"' + Cfg.get('device.id') + '"}', 0);

          HTTP.query({
            url: 'https://shara.s3-eu-west-1.amazonaws.com/job.json',
            success: function(body, full_http_msg) {
              print(body);
            }
            //error: function(err) { print(err); },  // Optional
          });


        } else {
          print('Empty Jobs call');
        }

      }, null);

    } else {
      print('Cannot subscribe to JOB topic -- Not connected!');
    }

  }


}, null);

// Set up Shadow handler to synchronise device state with the shadow state
Shadow.addHandler(function(event, obj) {
  if (event === 'UPDATE_DELTA') {
    print('GOT DELTA >>>>>>>>>>> :', JSON.stringify(obj));
    for (let key in obj) { // Iterate over all keys in delta
      if (key === 'on') { // We know about the 'on' key. Handle it!
        state.on = obj.on; // Synchronise the state
        setLED(state.on); // according to the delta
      } else if (key === 'reboot') {
        state.reboot = obj.reboot; // Reboot button clicked: that
        Timer.set(750, 0, function() { // incremented 'reboot' counter
          Sys.reboot(500); // Sync and schedule a reboot
        }, null);
      } else if (key === 'refresh') {
        let conf = {
          "refresh": obj.refresh
        };
        File.write(JSON.stringify(conf), "settings.json");
        Timer.set(750, 0, function() { // incremented 'reboot' counter
          Sys.reboot(500); // Sync and schedule a reboot
        }, null);
      }
    }
    reportState(); // Report our new state, hopefully clearing delta
  }
});

if (btn >= 0) {
  let btnCount = 0;
  let btnPull, btnEdge;
  if (Cfg.get('board.btn1.pull_up') ? GPIO.PULL_UP : GPIO.PULL_DOWN) {
    btnPull = GPIO.PULL_UP;
    btnEdge = GPIO.INT_EDGE_NEG;
  } else {
    btnPull = GPIO.PULL_DOWN;
    btnEdge = GPIO.INT_EDGE_POS;
  }
  GPIO.set_button_handler(btn, btnPull, btnEdge, 20, function() {
    state.btnCount++;
    let message = JSON.stringify(state);
    let sendMQTT = true;

    // AWS is handled as plain MQTT since it allows arbitrary topics.
    if (AWS.isConnected() || (MQTT.isConnected() && sendMQTT)) {
      let topic = 'devices/' + Cfg.get('device.id') + '/events';
      print('== Publishing to ' + topic + ':', message);
      MQTT.pub(topic, message, 0 /* QoS */ );
    } else if (sendMQTT) {
      print('== Not connected!');
    }
  }, null);
}


Event.on(Event.CLOUD_CONNECTED, function() {
  online = true;
  Shadow.update(0, {
    ram_total: Sys.total_ram()
  });
}, null);

Event.on(Event.CLOUD_DISCONNECTED, function() {
  online = false;
}, null);
Don't pay attention to code quality/style - this is only working proof-of-concept! ;-)
Step 8. Provision and onboard the device.
Go to cloned ...path-to/app1 directory, and just to be sure mos is functioning correctly and your source is good run: mos build --platform esp8266. As an answer we should see something like the following:
c:\Projects\esp-doc-test\app1>mos build --platform esp8266
Connecting to https://mongoose.cloud, user test
Uploading sources (3115 bytes)
Firmware saved to C:\Projects\esp-doc-test\app1\build\fw.zip

c:\Projects\esp-doc-test\app1>
Good. Looks like we're ready to go further. For faster provisioning/onboarding use the following commands, combined in a batch file (Windows). See the commands and comments below (COM5 is used for actual port, the device is connected to):
cls
rem Build the code for esp8266. Here we can use e.g. "esp32" as well
rem
mos build --platform esp8266
rem
rem Cross-platform DELAY for ~1 sec.
ping 127.0.0.1 -n 1
rem
rem Flash the built firmware to actual connected device
mos --port COM5 flash
rem DELAY for ~1 sec.
ping 127.0.0.1 -n 1
rem
rem Set Device name. Useful for grouping particular devices
mos --port COM5 config-set device.id=my-esp8266
rem DELAY for ~1 sec.
ping 127.0.0.1 -n 1
rem
rem Connect device to local WiFi:
mos --port COM5 wifi network-name network-password
rem
rem DELAY for ~1 sec.
ping 127.0.0.1 -n 1
rem
rem Connect the device to AWS IoT infrastructure
mos --port COM5 aws-iot-setup
rem
rem Open Mongoose OS console for
mos --port COM5 console
Place your BAT file inside the ...path-to/app1 directory and execute.
Sometimes at mos flash step we can get errors. In most cases this means connection to the device was unstable. If such errors occurs, - try to flash one more time, or better change your USB cable.
Now, look at mos console window, - there should be log information about your WiFi IP address, connection to the AWS IoT and current data refresh rate.
...
[SKIPPED]
...
[Nov 12 13:55:18.358] mgos_aws_shadow.c:358   Version: 0 -> 2 (5)
[Nov 12 13:55:18.387] mgos_aws_shadow.c:358   Version: 0 -> 3 (5)
[Nov 12 13:55:18.428] mgos_aws_shadow.c:358   Version: 0 -> 4 (5)
[Nov 12 13:55:21.319] CURRENT REFRESH RATE =  9000
[Nov 12 13:55:21.338] ONLINE ***********: true {"ram_free":27108,"refresh":9000,"uptime":19.404358,"btnCount":0,"on":false}

[Nov 12 13:55:21.382] AWS.isConnected() =  true
[Nov 12 13:55:21.388] MQTT.isConnected() =  true
[Nov 12 13:55:21.411] ==++++ Listening to  $aws/things/my-esp8266/jobs/notify
[Nov 12 13:55:21.428] mgos_mqtt.c:125         Subscribing to '$aws/things/my-esp8266/jobs/notify' (QoS 1)
[Nov 12 13:55:21.439] mgos_aws_shadow.c:250   Update: {"state": {"reported": {"ram_free":27108,"refresh":9000,"uptime":19.40435
8,"btnCount":0,"on":false}}, "clientToken": "00dcfc01"}
[Nov 12 13:55:21.621] mgos_aws_shadow.c:358   Version: 0 -> 5 (5)
[Nov 12 13:55:30.320] CURRENT REFRESH RATE =  9000
[Nov 12 13:55:30.338] ONLINE ***********: true {"ram_free":26964,"refresh":9000,"uptime":28.404355,"btnCount":0,"on":false}
Interesting things are: AWS.isConnected() = true /MQTT.isConnected() = true - means we are connected to AWS infrastructure and ==++++ Listening to $aws/things/my-esp8266/jobs/notify - means device is ready to receive Job requests from AWS.
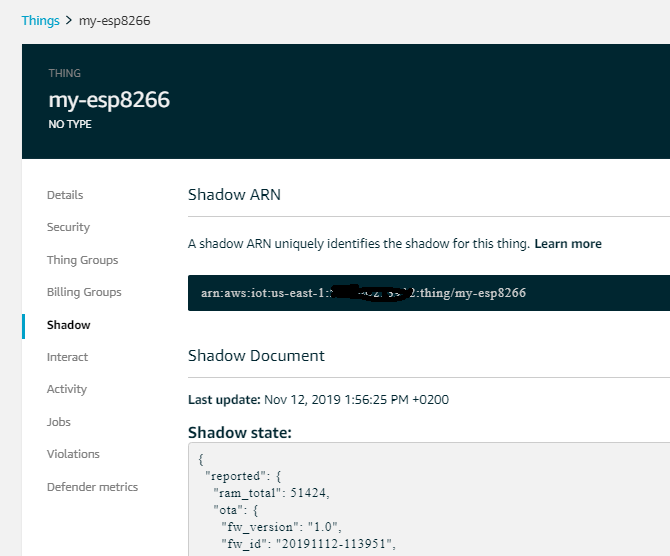
Open your browser and go to AWS console. Your named device should be visible in system:

Every provisioned device got it's own shadow in AWS. A device's shadow is a JSON document that is used to store and retrieve current state information for a device. The AWS Device Shadow service maintains a shadow for each device you connect to AWS IoT. You can use the shadow to get and set the state of a device over MQTT or HTTP, regardless of whether the device is connected to the Internet. Each device's shadow is uniquely identified by the name of the corresponding thing. For more details see AWS Device Shadow Service.
Luckily the Mongoose OS supports device shadows out-of-the-box. This greatly simplifies duplex data exchange. Check your device' shadow. At this moment, it consists of default data, sent by Mongoose OS, regarding the particular device:
Step 9. Send data back to device
The easiest way to send some data back to the device is to make changes in the device shadow. There's a special section in the device shadow called "desired": {}. It may be missing for just provisioned devices. Any updates to the desired section are reflected to the particular device via MQTT protocol and (what's really great!) this is supported out-of-the-box by Mongoose OS.
Let's create/edit the "desired": {} section. Edit your device shadow in the AWS console. Make your new section look like this:
{
 "desired": {

 },
  "reported": {
    "ram_total": 51424,
    "ota": {
      "fw_version": "1
...
When desired section is saved, changes are being sent to a device. It receives changes like a diff-json. (search for "DELTA" string in our source code).
IMPORTANT! The AWS IoT platform will continue to send updates like these till the "reported" section will have the same (new) values as "desired". In other words, when shadow update is received - do the necessary work, and send back the reported statement with the desired values. to stay "in sync". At the moment AWS IoT will have the equal values (e.g. {"a":1} in both sections - reported and desired it stops sending shadow updates.
In our sample, let's change the refresh interval, changing the default - 9 sec. to say 12 sec. All the logic of receiving the new value, saving to settings.json file locally on the device and getting the updated value into the loop,- implemented in our code (see above).
New desired section:
{
  "desired": {
    "refresh": 12000
  },
...
Save changes and see our device reboots itself (even several times, which is normal) and new refresh interval will be set (and saved) as 12 seconds. Also, notice new "refresh" value in the "reported" section.
Step 10. Prepare for collecting sensor data
As mentioned before, we didn't connect any of sensors to prevent flashing problems. Now, it's time to connect some data collecting stuff.
First of all let's change a bit our init.js code:
- add
load('api_dht.js');to the top load-section - add
let mydht = DHT.create(5, DHT.DHT11);beforelet wait_for_job = 0; - add
state.dht_temperature = mydht.getTemp(); state.dht_humidity = mydht.getHumidity();afterstate.ram_free = Sys.free_ram();line - add
print('TEMPERATURE:', mydht.getTemp()); print('HUMID:', mydht.getHumidity());afterprint('MQTT.isConnected() = ', MQTT.isConnected());line.
That's it. These changes let us connect to DHT11 sensor, save the values into the device state (i.e. "reported" section of the device shadow) and visually display them into the console.
Save changes, flush and provision the device, as described in Step 8.
Step 11. Rebuild
Rebuild your updated firmware and flash the device. Wait for the device up and running, you'll see new logged data regarding temperature and humidity. Most likely these values will be something like 9223372036854776000. That's why we haven't connected any sensor yet to prevent flashing problems.
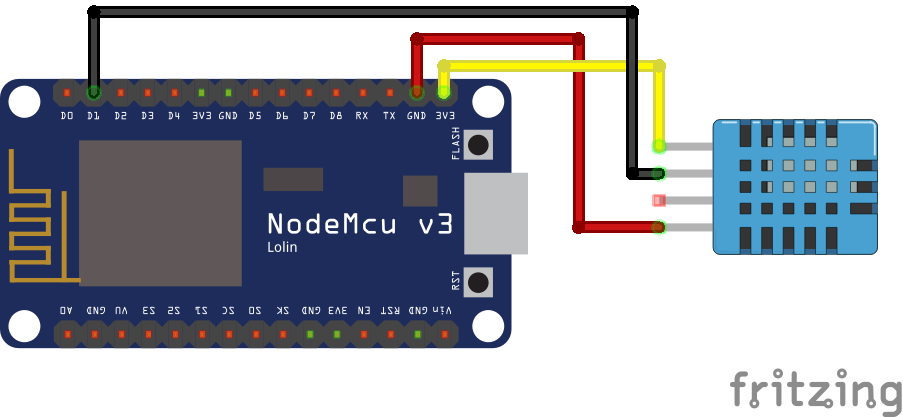
Step 12. Add sensor
Now, it's time to connect some data collecting stuff. Disconnect your board from the computer and connect DHT11 sensor like shown below:
Then plug your ESP board back and start the console: mos --port=COM5 console
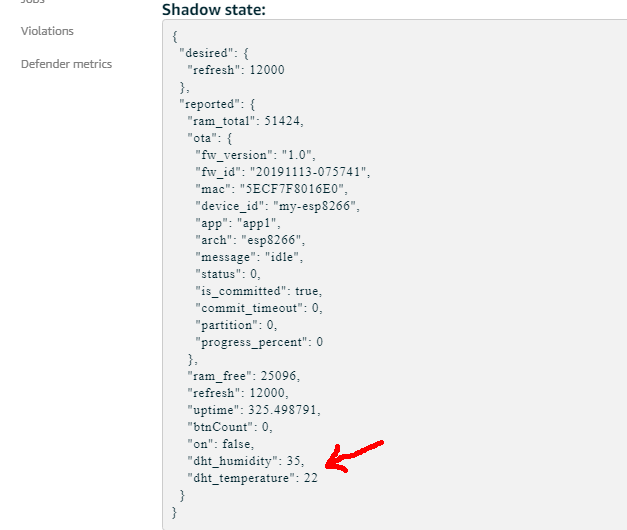
Check the log window, find the updated information from DHT11 sensor:
[Nov 13 10:06:35.774] ONLINE ***********: true {"dht_humidity":34,"dht_temperature":23,"ram_free":25096,"refresh":12000,"up
time":37.498724,"btnCount":0,"on":false}
[Nov 13 10:06:35.819] AWS.isConnected() =  true
[Nov 13 10:06:35.826] MQTT.isConnected() =  true
[Nov 13 10:06:35.832] TEMPERATURE: 22
[Nov 13 10:06:35.836] HUMID: 35
The same information appears in the device shadow, check AWS IoT Device shadow page:
Step 13. Working with multiple devices simultaneously
Sending data to the device via shadow is good but in this way we can only edit data for one particular device. When we need to send updates for several devices simultaneously, which should be a common practice, there the AWS IoT jobs comes up.
AWS IoT jobs can be used to define a set of remote operations that are sent to and executed on one or more devices connected to AWS IoT.
A job is a remote operation that is sent to and executed on one or more devices connected to AWS IoT. For example, you can define a job that instructs a set of devices to download and install application or firmware updates, reboot, rotate certificates, or perform remote troubleshooting operations.
A target for the particular job can be either one device or group of devices. The last option is especially interesting for us.
First of all, let's add the device to a group, and check the status using AWS CLI:
c:\Projects\esp-doc-test\app1>aws iot add-thing-to-thing-group --thing-name my-esp8266 --thing-group-name sensors
.
c:\Projects\esp-doc-test\app1>aws iot list-things-in-thing-group --thing-group-name sensors
{
    "things": [
        "my-esp8266"
    ]
}
Good. Our new group has 1 "thing" and we can send a job to this group, which will be received (via MQTT queue, named arn:aws:iot:us-east-1:your-aws-id:thinggroup/groupname) by all the devices on the group.
IMPORTANT NOTE:
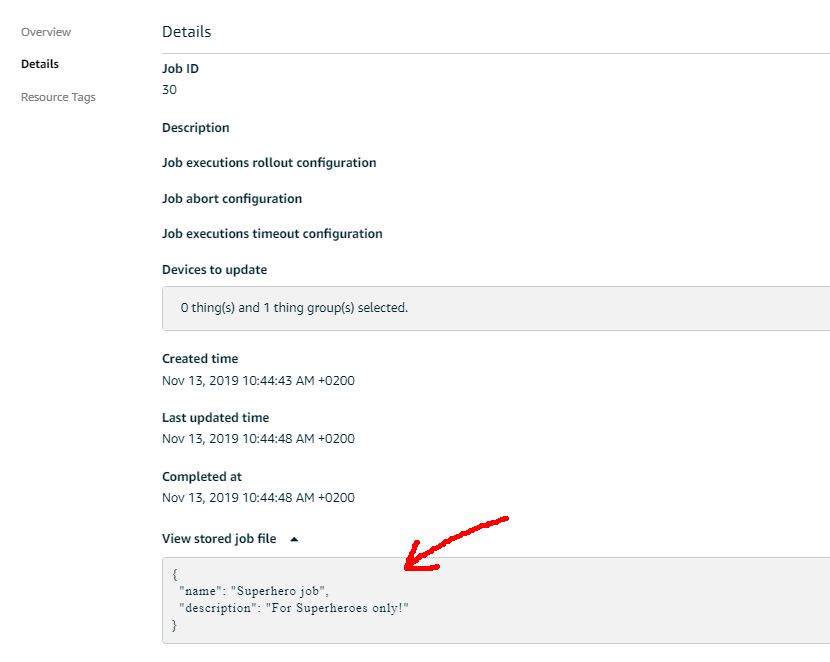
Every job should have document - any JSON (or other data) placed in AWS infrastructure, e.g. S3 bucket. This document will be downloaded and stored inside the job like this:
NB! Document is a mandatory parameter for the jobs.
As of November 2019 Mongoose OS does not fully support AWS IoT jobs. However it can receive the incoming message from the predefined jobs queue, e.g. arn:aws:iot:us-east-1:560101010101:thinggroup/sensors. No any attachments available here, most likely because the AWS is sending only the job metadata to the clients.
Most valuable data here is a job ID, which is unique inside AWS. So, using this unique job ID we can do the following workaround:
- place your JSON file anywhere in the internet, in a place, accessible from your IoT device network;
- receive a job and get the actual job ID;
- make HTTP GET request from your device, and download the JSON file content, building URL, using the job ID received, e.g.
https://my-server.com/job-JOBID.json
This approach already implemented in the sample code. For every new job we can use new JSON "payload" file.
So, let's use AWS CLI for creating a new JOB:
aws iot create-job --job-id 30 --targets arn:aws:iot:us-east-1:560101010101:thinggroup/sensors --document-source https://somebucket.s3-eu-west-1.amazonaws.com/job.json
and see the ESP8266 reaction:
[Nov 13 10:44:35.818] mgos_aws_shadow.c:250   Update: {"state": {"reported": {"dht_humidity":35,"dht_temperature":22,"ram_free"
:24924,"refresh":12000,"uptime":2317.498779,"btnCount":0,"on":false}}, "clientToken": "00dcfc01"}
[Nov 13 10:44:36.007] mgos_aws_shadow.c:358   Version: 0 -> 1426 (5)
[Nov 13 10:44:45.354] ### JOB RECEIVED!!!:  {"timestamp":1573634686,"jobs":{"QUEUED":[{"jobId":"30","queuedAt":1573634685,"last
UpdatedAt":1573634685,"executionNumber":1,"versionNumber":1}]}}
[Nov 13 10:44:45.914] mg_ssl_if_mbedtls.c:35  0x3fff25bc ciphersuite: TLS-ECDHE-RSA-WITH-AES-128-GCM-SHA256
[Nov 13 10:44:46.595] SW ECDH curve 3
[Nov 13 10:44:52.452] CURRENT REFRESH RATE =  12000
[Nov 13 10:44:52.513] ONLINE ***********: true {"dht_humidity":35,"dht_temperature":22,"ram_free":13128,"refresh":12000,"up
time":2334.264608,"btnCount":0,"on":false}
[Nov 13 10:44:52.563] AWS.isConnected() =  true
[Nov 13 10:44:52.569] MQTT.isConnected() =  true
[Nov 13 10:44:52.575] TEMPERATURE: 22
[Nov 13 10:44:52.580] HUMID: 35
[Nov 13 10:44:52.674] mgos_aws_shadow.c:250   Update: {"state": {"reported": {"dht_humidity":35,"dht_temperature":22,"ram_free"
:13128,"refresh":12000,"uptime":2334.264608,"btnCount":0,"on":false}}, "clientToken": "00dcfc01"}
[Nov 13 10:44:52.861] {"name": "Superhero job", "description": "For Superheroes only!"}
Notice the ### JOB RECEIVED!!! marker and {"jobId":"30" ID. The last line indicates, that we're successfully downloaded the JSON payload file from the custom URL. Just add your own logic as a reaction to the particular payload.
Mongoose OTA firmware updates
to be continued...
Reference links:
- https://docs.aws.amazon.com/cli/latest/userguide/cli-chap-configure.html#cli-quick-configuration
- https://mongoose-os.com/docs/mongoose-os/cloud/aws.md
- https://github.com/mongoose-os-apps/demo-js
- https://www.hackster.io/mongoose-os/internet-button-on-esp8266-and-aws-iot-tutorial-fbda3e
- https://mongoose-os.com/docs/mongoose-os/api/net/shadow.md
- https://aws.amazon.com/blogs/apn/aws-iot-on-mongoose-os-part-1/
- https://forum.mongoose-os.com/discussion/2325/mjs-callback-error-http-is-not-defined
- https://forum.mongoose-os.com/discussion/1111/https-client-server-authentication-with-certificates
- https://docs.aws.amazon.com/iot/latest/developerguide/iot-device-shadows.html